Welcome to Relate!
Relate is a research and technology solution developed by a team of trust, security and digital experts for you to deliver on customer obsession and measure how effective your representatives are at building and maintaining trust.
This is a quick overview of what you need to know when setting up your first meeting using Relate as well as tips to deliver on customer centricity and hold that sales discipline throughout your experience.
By the way, if you are a Relate for Enterprise subscriber, be sure to contact your dedicated account manager for assistance.
Section Overview
In this section you will learn:
Where to start creating an event
What do the Actions icons mean
What is in the Analytics column
How to host an event / meeting on Relate
How to host an event / meeting on Relate for Microsoft Teams
How to host an event / meeting on Relate for Zoom

Where to start creating an event.
Click on the Create Event button in the top right corner of your dashboard then go to Step 2.
What do the Actions icons mean.
Lets work through them in numerical order:
(1) Your avatar: Click on this to logout or change password.
(2) Meetings: This shows how many meetings there are within this event (1-4).
(3) Edit event icon: Where you can edit events that are either in Draft or have been Published.
(4) Unanswered questions: Click here to answer questions away from the meeting. Unanswered questions can be allocated to team members.
(5) Event Link: Click here to copy the link to the registration page for the event. For 1×1 or roundtable meetings, this is a calendar invite to send to your co-hosts from your own email should you choose.
(6) View Event Participants: Only visible for few to many meetings. This shows who has registered for your event.
(7) Disable Event: Use this to delete a draft or published event.
(8) Co-host(s): Displays co-hosts, connectivity diagnostics and the place to resend a meeting invite if needed.
(9) Launch Meeting: This launches the meeting platform you have chosen: Relate, Relate for Teams, Relate for Zoom (launching soon), In-Person (sales notes within Relate Portal).
(10) Sales Notes: This launches a back-up meeting notes section.
What is in the Analytics column.
Event Dashboard: Click here to return to your dashboard.
Attendee Analytics: Tracks the individual behavior of attendees at meetings over time.
Event Analytics: Tracks the aggregate behavior of attendees at meetings over time.
Network Behavior: Can only be viewed by Enterprise subscribers. Consumer sentiment research from anonymized behavior in meetings across our network.
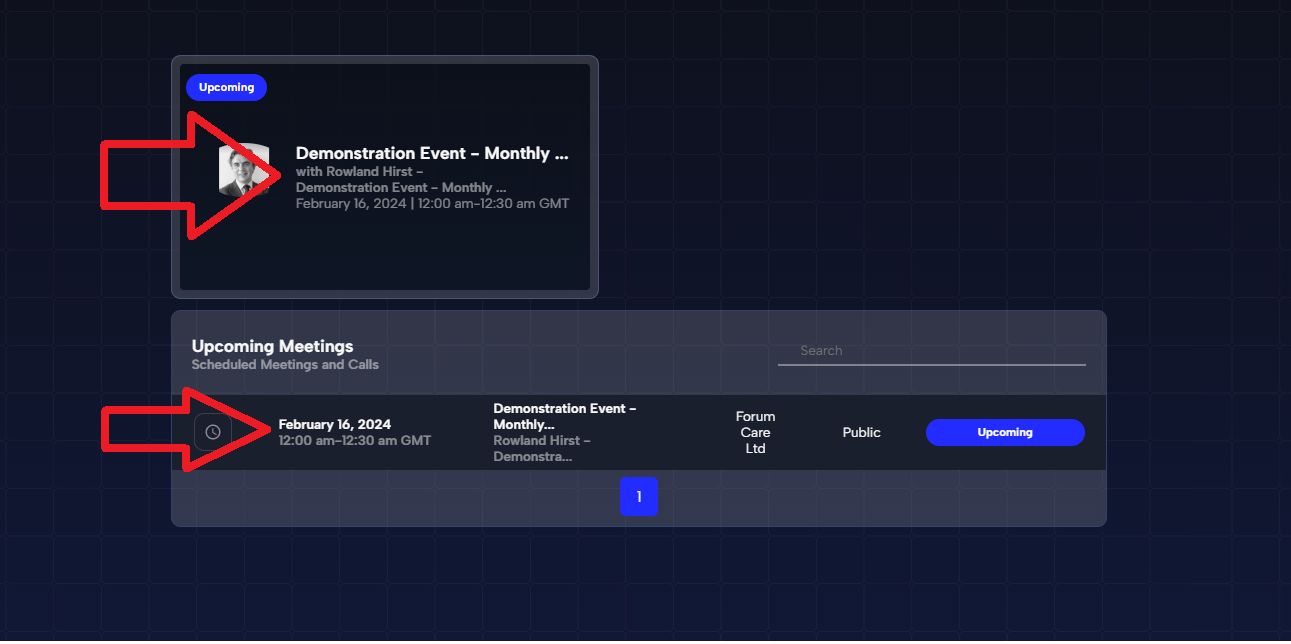
Launch your meeting in Relate.
Click on the play button to open Relate. After you have logged in, click anywhere on the event that you want to launch.
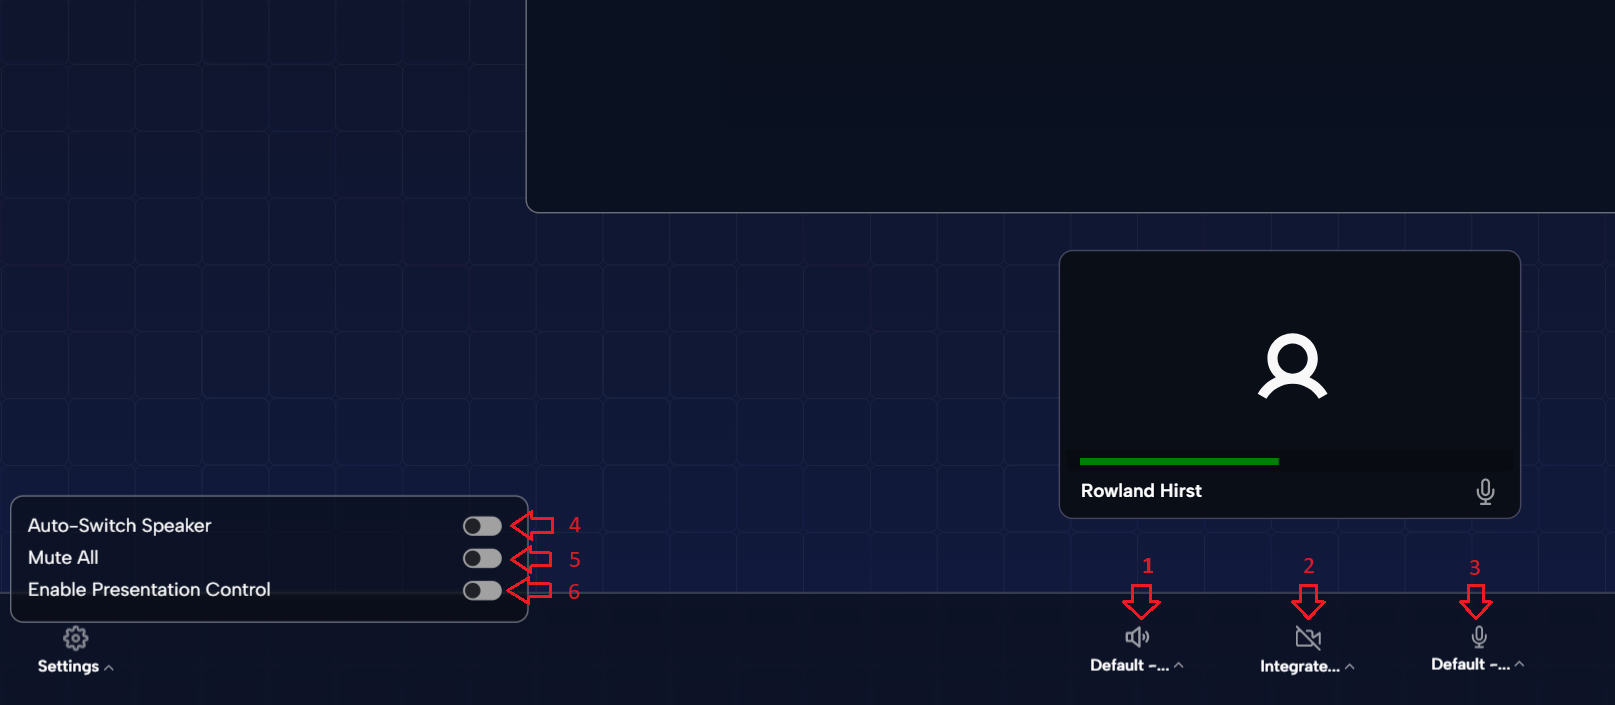
If the event is 1×1 or roundtable, then you will next be invited to Start the Meeting. Before doing so, check your settings which are numbered in the image below as follows:
(1) Your preferred speaker
(2) Your preferred camera
(3) Your preferred microphone
(4) Auto-Switch speaker. If turned on, the person talking at the time will be on Main Screen. If turned off, you can select who is main screen by clicking on the person you would like to make main screen
(5) If you would like to mute everyone in the room
(6) If you would like to allow your co-hosts to share their screen
A pop-up with your customizable check-list appears after you click Start Meeting.
If the event is few to many, then you will next be invited to Join Waiting Room. In the waiting room, you and your co-hosts can prepare ahead of starting the meeting. Once you Start Meeting, then the meeting is Live for all other attendees, joining from their browser.
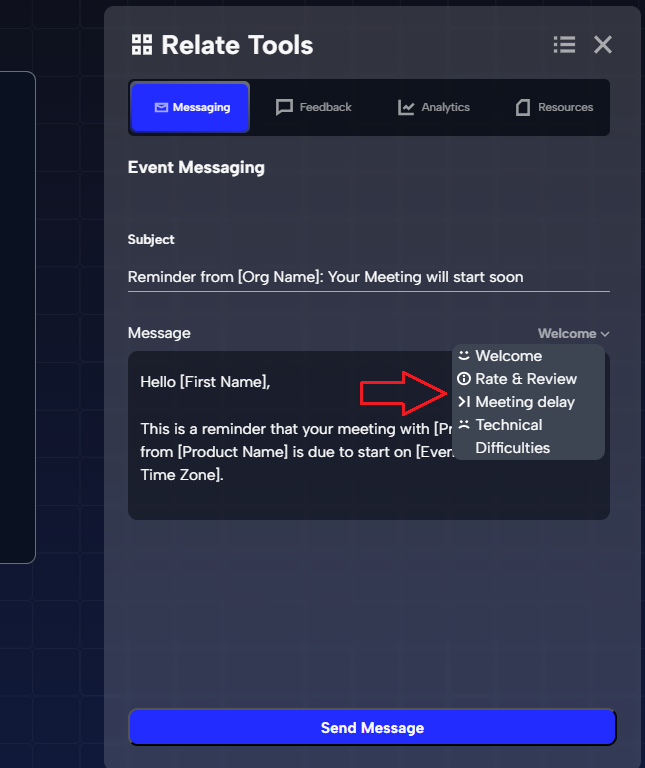
You can quickly message those coming to your meeting, via email, as follows. Click on the Tools icon in the footer. This will open up a right hand side pane with four tabs. Click on the Messaging tab as per the below image. There you will see a range of emails that you can send from welcome notes through to technical difficulties.
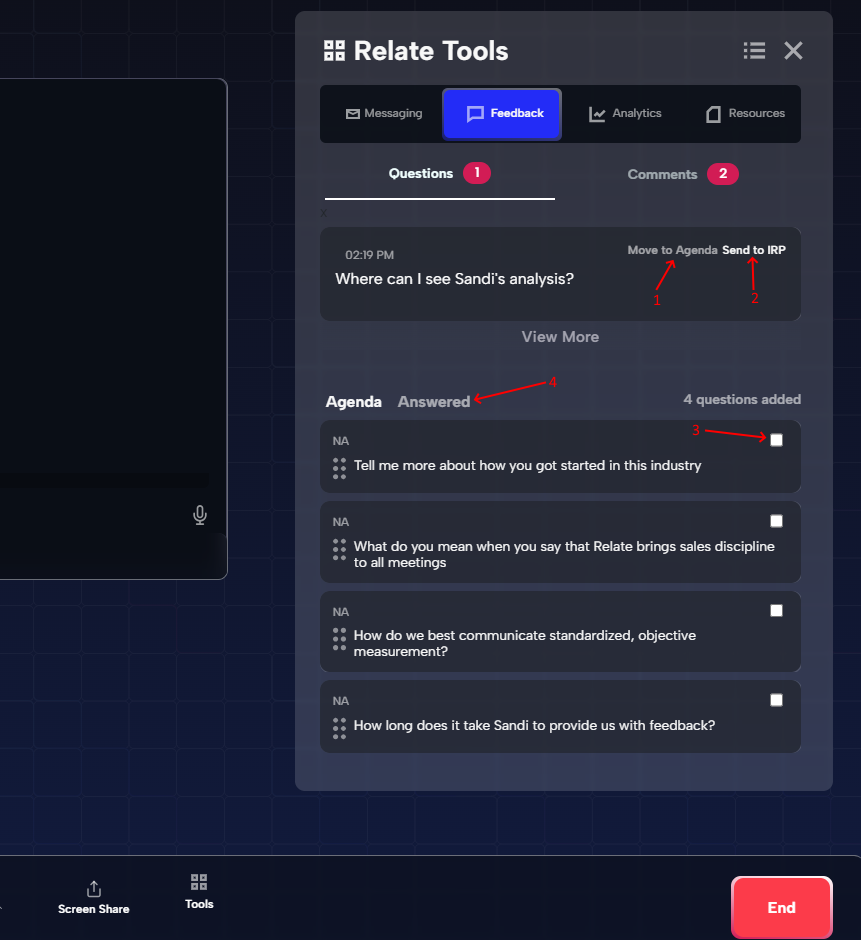
Click the Feedback tab to show the meeting agenda as well as workspace for you and the moderators that you have invited to help you manage live questions. A reminder that a moderator is a licensed individual from your organization who is not the designated host nor the presenter for this event. The moderator only has shared control over this tab and can also contribute to the intelligence gathered on the Resources tab. The moderator can also send messages from the Messaging tab. Note the layout of the Feedback tab as follows:
(1) Where you can move incoming questions to the agenda for the event. Note that your co-hosts can only see the agenda items for the event
(2) Where you send questions you want to respond to after the event instead of during it, from the Unanswered Questions section of your Relate Portal
(3) Check this box once the question has been asked during the meeting or when you think this agenda item has been addressed. The agenda item will move to the Answered section
(4) Click here to view agenda items that have been addressed. You can put them back on the agenda from here.
To learn more about the Analytics tab, click here
To learn more about the Resources tab, click here
Launch your meeting in Relate for MSFT Teams.
Click on the play button to open MSFT Teams. Join the meeting as you would normally do on Teams. We would recommend that you join Teams a few minutes before the scheduled start time to start Transcription and to open the Relate app within Teams.
Then follow these steps:
(a) Start Transcription
(b) Open the Relate app
(c) Type in your email address to view all the tabs.
The tabs in Relate for MSFT Teams have the same functionality as in Relate (native). Please review the guides to each tab above.
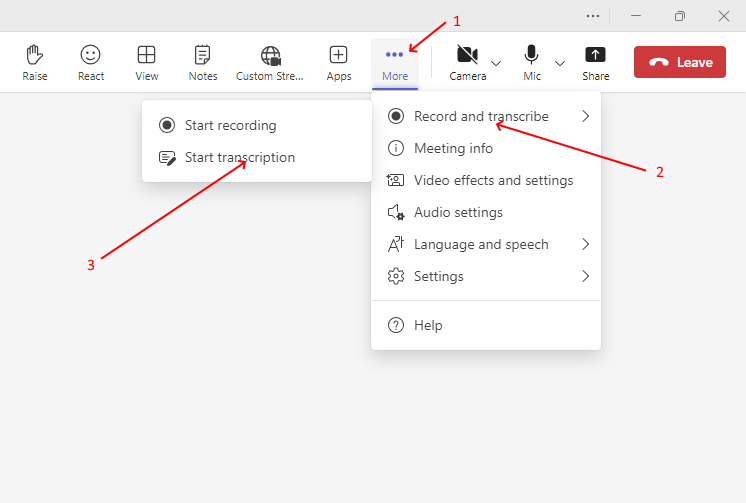
(a) Start Transcription as follows:
(1) Click on More…
(2) Click Record and Transcribe >
(3) Click Start Transcription
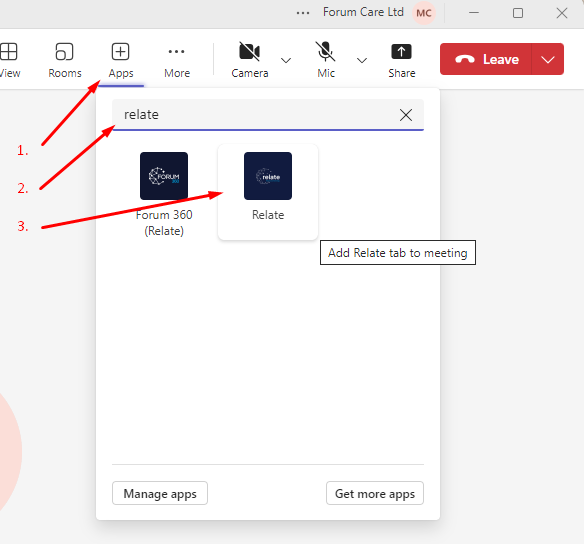
(b) Open the Relate app as follows:
(1) Click on Apps
(2) Search for Relate if the app is not showing
(3) Select Relate to open the app.
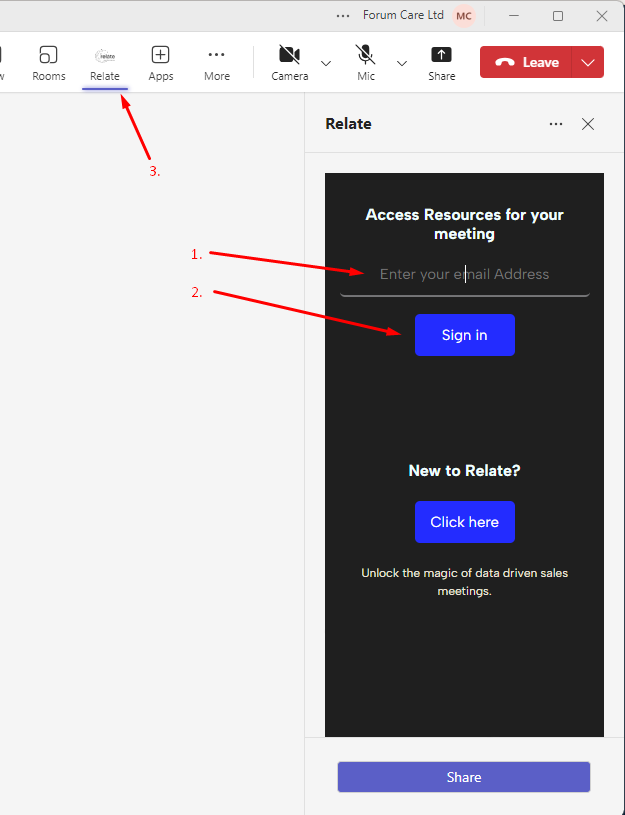
(c) Type in your email address to view all tabs (1):
(2) Click Sign In
(3) Your co-hosts can now see the Relate icon at the top of their MSFT Teams interface. Have them click on the App then enter the email address where they received their invite. Now they can follow the agenda with you and access the Resources tab for their safe space to provide feedback while researching your product in more detail, booking follow up meetings and exploring ways to invest, buy or apply for your product or service.
Launch your meeting in Relate for Zoom.
Click on the play button to open Zoom. Join the meeting as you would normally do on Zoom. We would recommend that you join Zoom a few minutes before the scheduled start time to start Transcription and to open the Relate app within Zoom.
Then follow these steps:
(a) Start Transcription
(b) Open the Relate app
(c) Type in your email address to view all the tabs.
The tabs in Relate for Zoom have the same functionality as in Relate (native). Please review the guides to each tab above.

(a) Start Transcription as follows:
(1) Click on Record
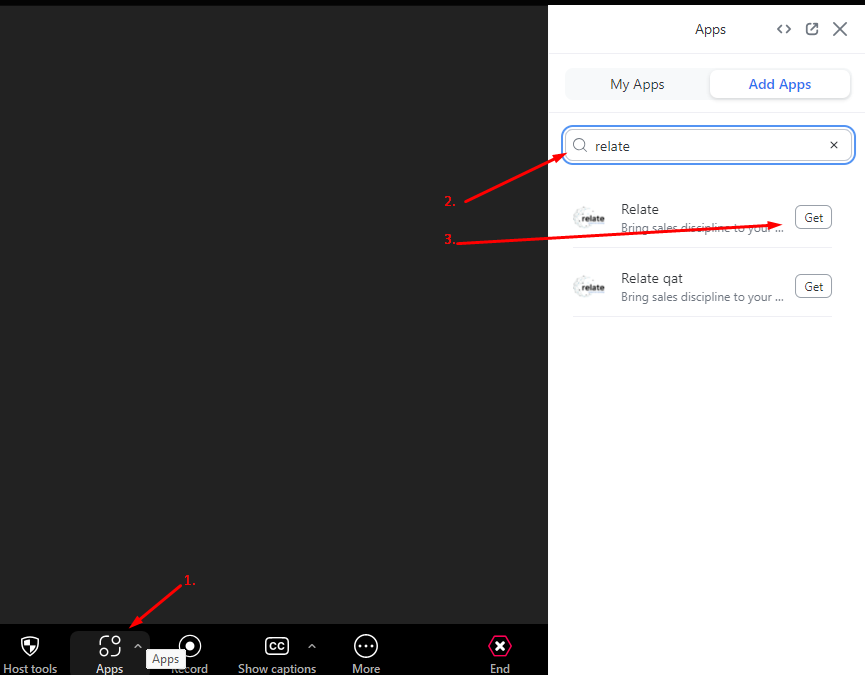
(b) Open the Relate app as follows:
(1) Click on Apps
(2) Search for Relate if the app is not showing
(3) Select Relate to open the app.
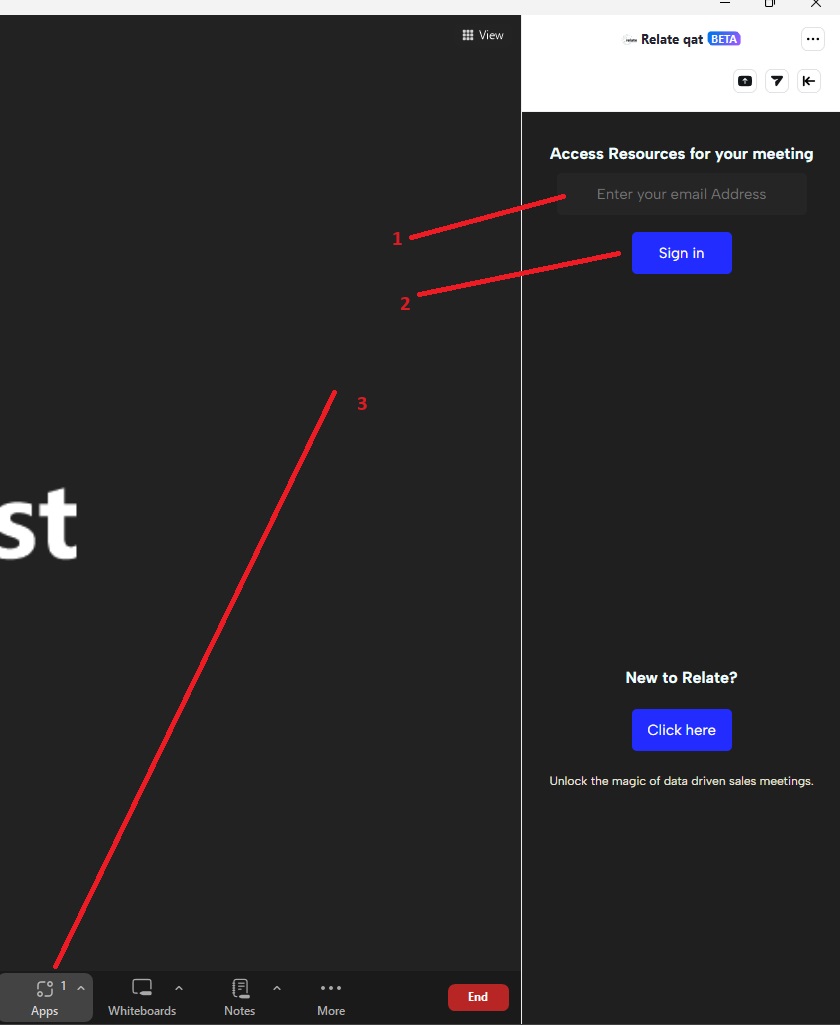
(c) Type in your email address to view all tabs (1):
(2) Click Sign In
(3) Your co-hosts can now access the Relate app using the same process that you followed. Have them click on the App then enter the email address where they received their invite. Now they can follow the agenda with you and access the Resources tab for their safe space to provide feedback while researching your product in more detail, booking follow up meetings and exploring ways to invest, buy or apply for your product or service.
Should you wish to remove the Relate App from your Zoom account, please take the following steps
(a) Login to your Zoom Account and navigate to the Zoom App Marketplace.
(b) Click Manage >> Added Apps or search for the Relate app.
(c) Click the Relate app.
(d) Click Remove.
Integrate with your CRM and video communications platform.






Launching soon
Testimonials
“Thank you for making this meeting about me and my agenda”. Investor feedback to a product manager who uses Forum 360
“My clients are benefiting from frequent meeting access to my experts without having to leave an experience provided by my brand.” Client of Forum 360.
”Working together to ensure my clients feel like they are in a relationship with the managers of their money, while enhancing my business model – count me in” Wealth manager working with a client of Forum 360.

